O
S
OpenSplit
opensplit.com
Manage your account settings.
Set Alias
Profile Image
Monthly Funding Options
Enable Funding
Current Funds
Target Funds
$
Change Username
Delete Account
Welcome back.
Username
Password
Forgot password?
New password
or register
Create an account.
Username
Email
Password
Confirm Password
We have sent an activation key to your email address.
Please click the provided link to activate your account.
Please click the provided link to activate your account.
or login
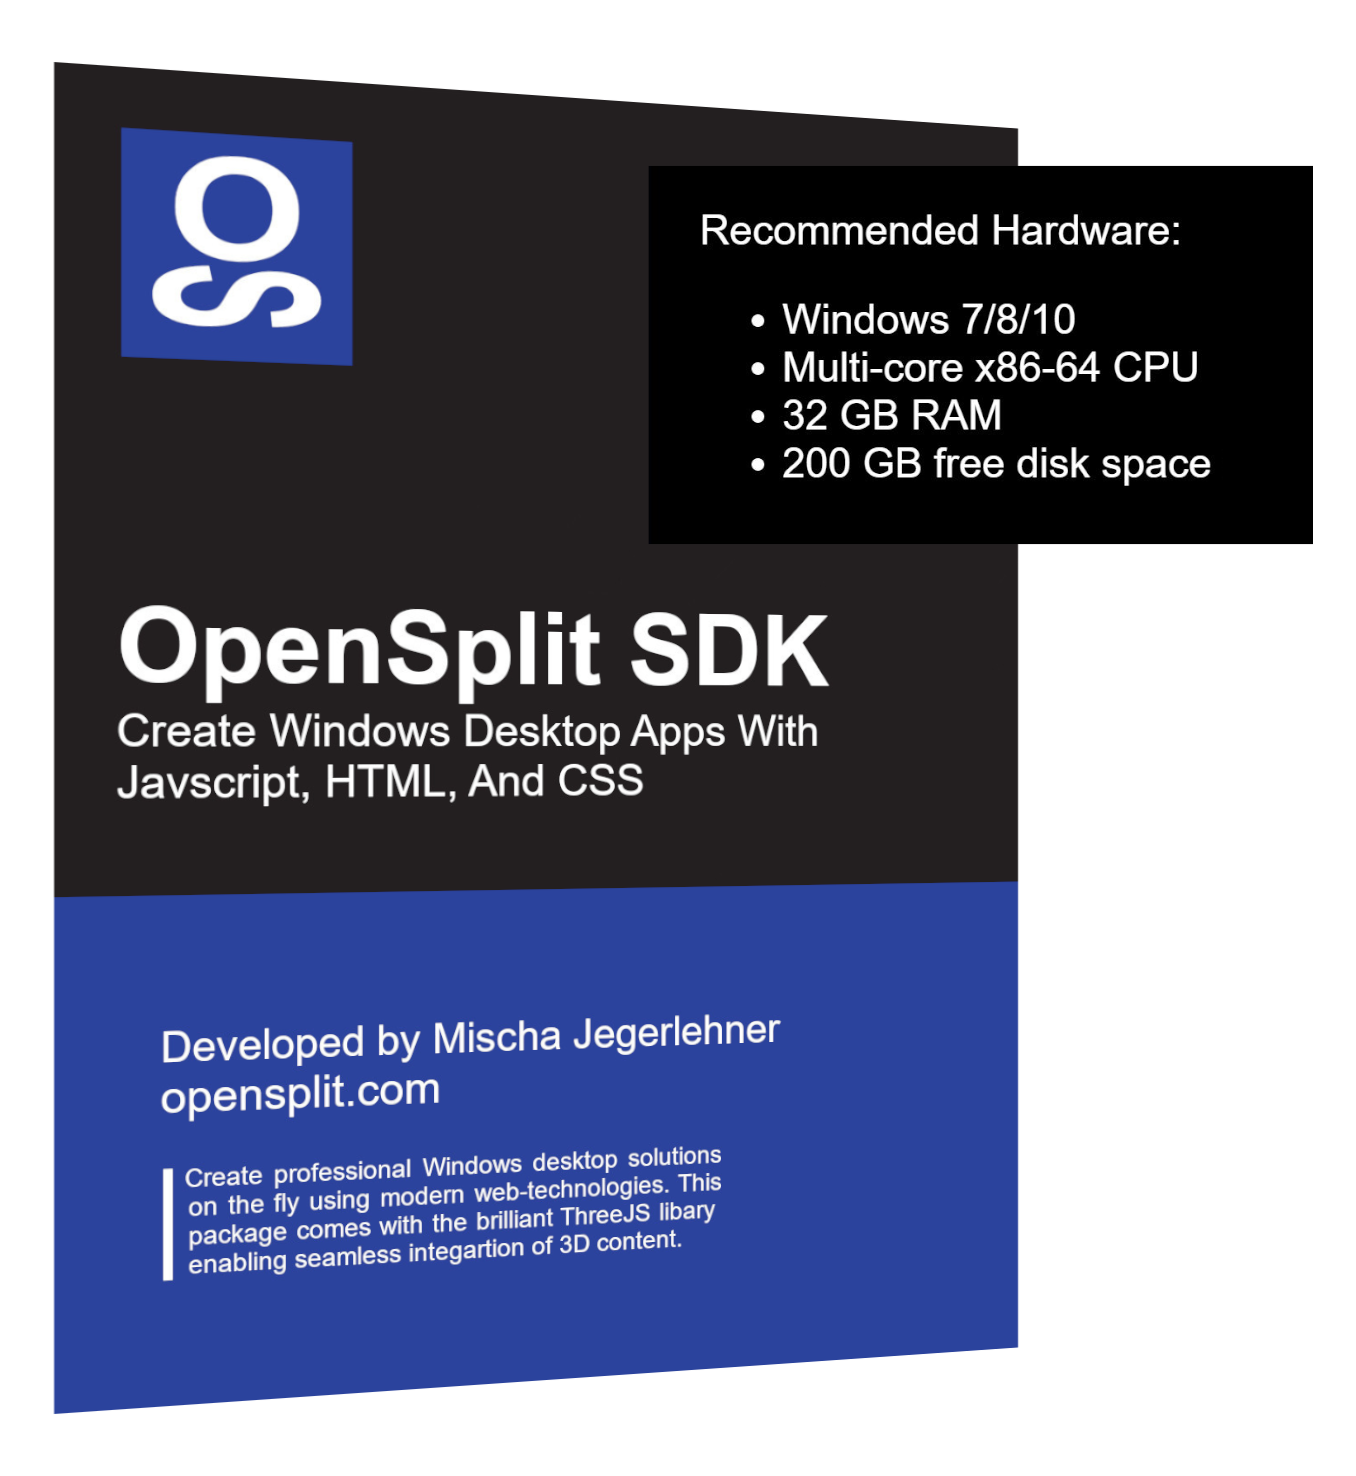
OPENSPLIT SDK
Create Windows Applications On The Fly Using Web Technologies

Check Out The Documentation & Tutorials
1. Basic Usage
- Setup New Projects With Just A Few Clicks
- Easy Native Windows Title Bar Integration
- Test Your Application In Preview Mode
With the power of Python and V8 OpenSplit SDK allows you to start creating stunning
Windows desktop apps using HTML CSS and JavaScript with just a few clicks. Get your ideas
off the ground right away and deploy them in an instant. This is ideal but
not limited to:
- All Kinds Of Desktop Applications
- Prototyping And Testing Initial Concepts
- Fun And Innovative Indie/AA Games
2. Download v0.0.2
OpenSplit SDK
FREE
- Startup License
- Max. 2 Users
Download v0.0.2
Studio License
$125
- Small Company
- max. 3 Users
Purchase License
Business License
$10/mo
- Large Company
- per seat
Monthy Charge
Annual License
$8/mo
- -20% Discount
- per seat
Annual Charge
3. Development Roadmap
Future Plans For OpenSplit SDK
As of December 2024, OpenSplit SDK version 0.0.2 has released adding a few hotfixes and two minor features. While our software development kit is only in its earliest stages it has already proven to be very useful. For our upcoming game 'Dark Delver' I am planning on using OpenSplit SDK in order to bring our own original world of '3876 AD' to life. During development I will certainly create more features which can later be incorporated into the existing code base of OpenSplit SDK.
There are some major breakthroughs which I want to achieve with OpenSplit SDK, eventually making it into a tool that can be used to create professional desktop solutions and on top of that, also lends itself for streamlined 3D game development. Here are the most important next features:
- Year 1 [v0.1.0]Updated SDK User Interface And Code Editor
- Year 2 [v0.2.0]Streamlined Collaborative Code Management For Teams
- Year 3 [v1.0.0]Modern 'State Of The Art' 3D Game Engine Features
- Year 4 [v2.0.0]Improved V8 Integartion And Better Performance
- Year 5 [v2.1.0]All Licenses Are Free And The Code Is Open Source
4. Support My Work
Funding And Hiring More Employees
OpenSplit SDK has been in development for about a year and was entirely made by just one person and a lot of help from the internet. There is only so much a single developer can achieve alone, and there are other projects that need attention.
I will keep providing support and may work on requested features, but I will not be able to work on the roadmap mentioned above by myself. I will be making heavy use of OpenSplit SDK in the future and therefore improve upon the project passively.
As a passionate programmer and artist, I will continue working on this project no matter what. Of course you can support this project and my work by providing some funding below 😉
Monthly Funding
$/mo
- OpenSplit SDK
- Development Funding
Support Project
5. Documentation
5.1 User Interface Overview
This is the default user interface of OpenSplit SDK when working on a project:
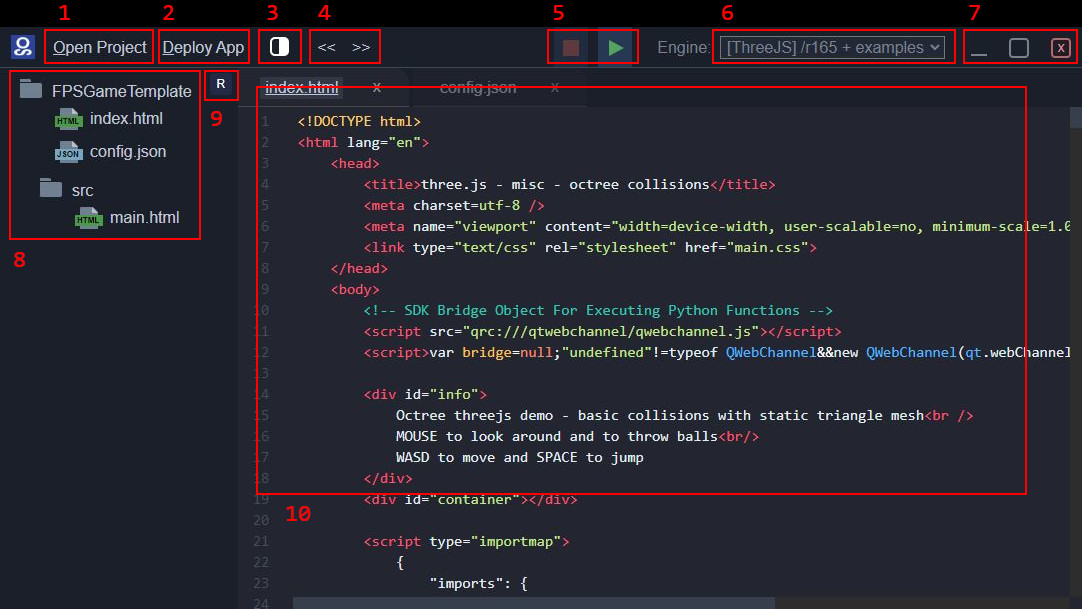
This is the default user interface of OpenSplit SDK when working on a project:
1: Open a drop down dialogue for creating new projects, choosing your working
directory and opening existing projects.
By default the working directory should be
set to the Documents directory. The working directory will only contain links
to the respective projects. The actual location of all your projects is inside
/app in your OpenSplit SDK installation. For OpenSplit SDK projects
to work, the source code must always be located in /app. By using
links in the selected working directories we are still able to easily organize multiple
sets of projects on our local system or elsewhere.
2: Open the deploy options and 'export' your project and create either a
professional solution or something like a game.
This system will copy all necessary
files and moves them into the selected directory. OpenSplit SDK also comes with the
Nullsoft Scriptable Install System (NSIS) which lets you conveniently create an
installer EXE from a script. In OpenSplit SDK this process is completely automated,
but you can always change the NSIS script later. We will touch on this subject
in more detail later and cover how to set your own app icon, something that is not
covered in the video courses.
3: With more than one file open this icon gives us the ability to split the selection into a seperate view.
The icon will flip-flop between one and the
other side to indicate which way the split will happen. OpenSplit SDK currently supports
only one split but this may change in the future as we add more features to the code viewer.
4: Once more than one file is open you can sort the tabs in the code view by using the arrows.
This does not work across the split view mentioned above and is OpenSplits SDK's solution to not
having a drag and drop feature for the tabs as of right now. As mentioned above this may
change in future updates and be improved upon.
5: With OpenSplit SDK you can test your projects out on the fly.
This preview mode is
especially useful because it uses the very same system that your application will be using
when 'exported' via the Deploy App dialogue. You can use the green triangular play button
to start the preview and close the window at any time when using the red square stop button.
6: One major benefit of using OpenSplit SDK would be the seamless integration of ThreeJS.
With this library
you can create 3D graphics in your program without much setup. OpenSplit SDK even comes with two
fully functioning examples. You can use this drop-down menu to switch between the different versions
of ThreeJS you have included in /threejs in your OpenSplit SDK installation. When loading a
project with ThreeJS enabled, OpenSplit SDK will copy the necessary files over while working and
will erase them again when closing the program. With this you can create as many projects as you
want without needing to worry about disk space. It is also the reason why it is so important to
not write any of your code outside of the /src directory as everything outside of that is
subject to automatic file updates that OpenSplit SDK needs to perform.
7: You can minimize, maximize and close OpenSplit SDK with these three buttons.
These three
buttons work the same way as the buttons in the Windows Title Bar example. In fact
the entire title bar uses the same system which means OpenSplit SDK itself is a good example
on how you can customize the title bar to your liking.
8: This is where your project folders are displayed.
Interactions are still very limited
and may be expanded upon in later versions. For now, you can open files by double clicking it, and you can
open the file location in our local file browser by right-clicking and then choosing the Open Directory
option that appears in the context menu.
9: After adding new files, renaming or moving them the file tree will not be updated automatically.
By
clicking this 'R'-button we can refresh our view updating the changes in our file system. In later versions this feature could be automated but updating
files constantly is tricky and will not take immediate priority.
10: Finally this is the main code view, in this case we have no split set.
The main code viewer is made with the help of Codemirror and
comes with tabs on the top. You can close each code via the tab and there will also appear a small blue
dot on the tab to indicated that the file contains now unsaved changes.
5.2 Beginner Video Courses
In the following three video courses you will learn how to use OpenSplit SDK for your own software solutions.
In the following three video courses you will learn how to use OpenSplit SDK for your own software solutions.
Video Course 1: The first course will cover just the very basics and showcases some programming ideas along the way. We will cover
creating a project and adding files. The start of this mini-series will give you a good head start on how you can
organize your code by introducing a fully dynamic approach on UI generation. We will also cover more in detail how
object variables work and how we can exploit the structure to create dynamic event handlers.
Video Course 2: In second course will touch upon a few important details about debugging and deploying your software.
The video also showcases a clever way of including the data-* property to trigger functions dynamically.
At around 4:33 note that you can replace the application icon icon.ico and use
any other image you want for your software instead.
Video Course 3: Finally, the last course is all about the additional features and how they work, including ThreeJS integration.
These features are only the beginning of what OpenSplit SDK can offer. In the future these can be expanded upon and with enough support
can eventually even be turned into a system offering modern game engine solutions for 3D applications.
5.3 Python Bridge Functions
These are the included Python hooks available to us. The names of the functions are subject to change as we have not streamlined all bridge functions. We will keep older deprecated functions intact, but we encourage to use the newer versions. Note that these are only a hand full pre-defined functions I deemed most useful. Any requests for specific Python hooks can be made here in our community forum.
These are the included Python hooks available to us. The names of the functions are subject to change as we have not streamlined all bridge functions. We will keep older deprecated functions intact, but we encourage to use the newer versions. Note that these are only a hand full pre-defined functions I deemed most useful. Any requests for specific Python hooks can be made here in our community forum.
bridge.close():
@pyqtSlot()
def close(self)
This function will close the application. Use this with either a windows title bar
for a professional solution or use it for an exit button when creating a game. When using a
browser for debugging you can refresh the webpage to get rid of any remaining playing audio.
bridge.toggle_app_maximize():
@pyqtSlot()
def toggle_app_maximize(self)
With this function you will toggle the maximize mode of the application window. This
should be similar to the borderless windowed mode you see in most recent games. If there
is a need for better fullscreen integration just let me know and I will see to it.
bridge.toggle_app_minimize():
@pyqtSlot()
def toggle_app_minimize(self)
With this fuction you can minimize the application window. This is best combined with
a windows title bar, providing respective buttons. In general, the minimize button uses an
underscore symbol as its icon but as always this is entirely up to your own preferences.
bridge.readFile(path, (str)=>{}):
@pyqtSlot(str, result=str)
def readFile(self, path)
Read files on your local machine using Python as intermediary. You can use an absolute
path or use the relative path of your project app/MyProject/MyProject/src/myFile.txt and
receive an asynchronous callback with a string as parameter containing the contents.
bridge.writeFile(path, text, (str)=>{}):
@pyqtSlot(str, str, result=str)
def writeFile(self, path, text)
Writing to a file works similarly to reading but instead of only a path you will also be
able to provide a text that should be written to the file. This function will overwrite the entire
file using UTF-8 encoding and return a callback containing a string with the new contents.
bridge.loadFile(path, (str)=>{}):
@pyqtSlot(str, result=str)
def loadFile(self, path)
This function will load any binary file into a base64 string. With this you can load in audio
or model files from your local system. This is also practical for sensitive information which
can by obfuscated in a binary file. Note that this is only a weak security measure.
bridge.trigger_user_gesture_on_page():
@pyqtSlot()
def trigger_user_gesture_on_page(self)
When playing a sound, be it just an effect or music the user must first interact with the web
application at least once. To play a sound on startup use this function. A working example
of this can be found in the Howler SoundManager template.
bridge.pointer_lock():
@pyqtSlot(result=str)
def pointer_lock(self):
The mouse can be locked back to the center of the screen via Python. For example in
games with a free moving camera this prevents the mouse from ever moving out of the app window.
A simple example of this can be found in the provided FPS Game Template.
bridge.select_directory((str)=>{}):
@pyqtSlot(result=str)
def select_directory(self)
The user can open a file browser an choose a directory. This path will be included in the
callback of this function. Use this to give the user the ability to set a default
directory in professional solutions or choose from different save when creating a game.
5.4 Deploy App Installer
To create an installer EXE OpenSplit SDK uses the NSIS dependency, here are some key points:

To create an installer EXE OpenSplit SDK uses the NSIS dependency, here are some key points:
1: By selecting the Create Installer option OpenSplit SDK will automatically create an NSIS script.
This process uses the generated script in order to create the installer EXE and may
take some time, the application may freeze temporarily, do not worry just be patient. Once
the process has finished you will find the installer EXE in the selected output folder.
2: In the OpenSplit SDK install directory you will find basic-installer.nsi containing the last generated installer script.
If you are familliar with the Nullsoft
Scriptable Install System you will easily understand how this script works. If you want to create your own script, do not change
the generated files if you want this process to work properly, instead just copy them into another directory.
3: This is an example of the generated NSIS script, in this case we made one with the FPS Game Template as base.
As you can see, we have created an installer EXE with the NSIS specific scripting language automatically with OpenSplit SDK.
NSIS is a very useful tool and you create your own installers using the generated script as boiler plate template.
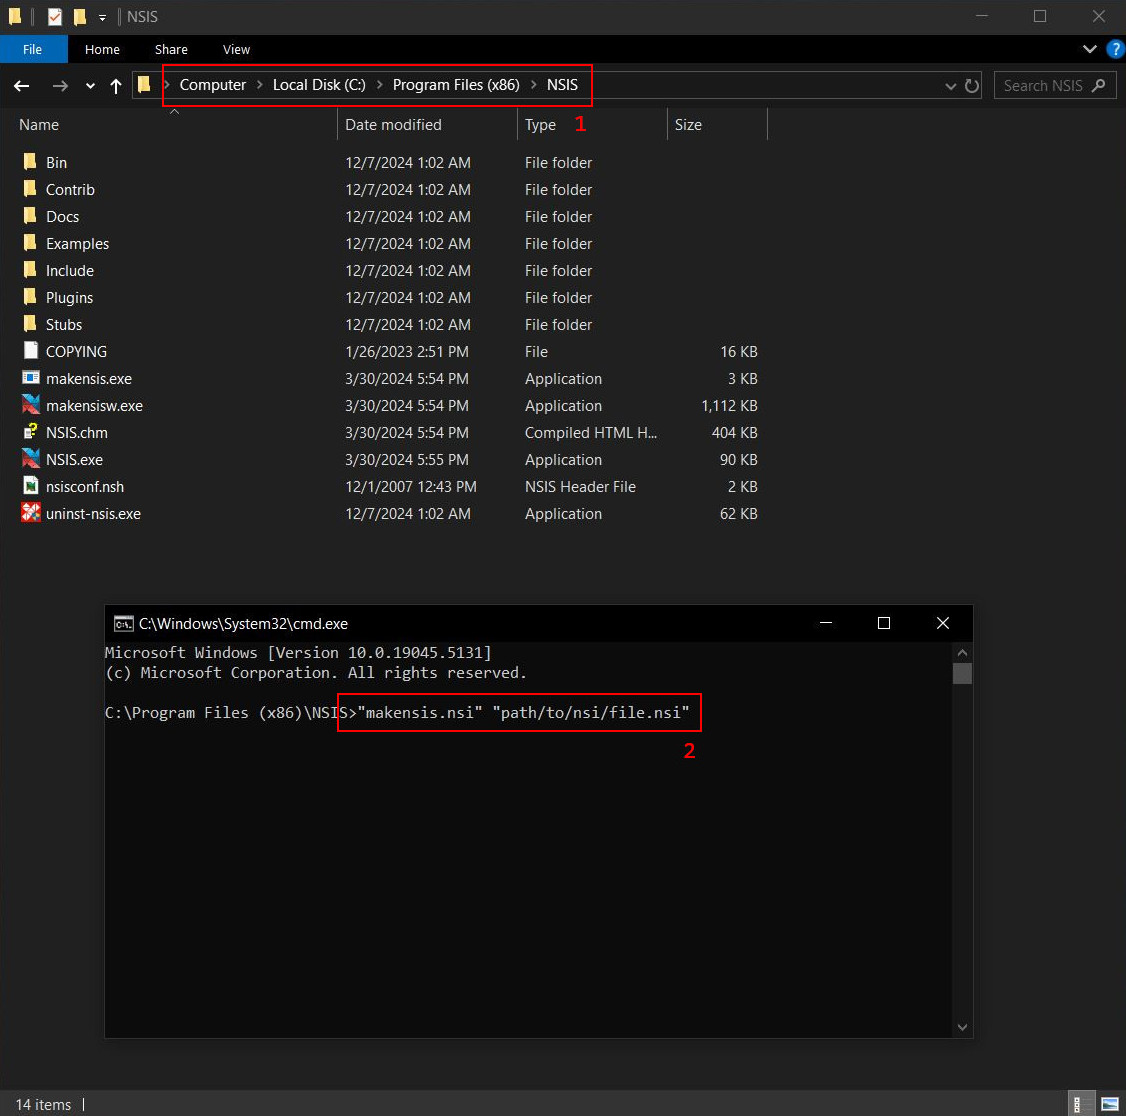
1: To run any NSIS script you will need to execute the makensis.exe file in the NSIS install directory.
Navigate to your NSIS installation directory, replace the file path with cmd and press enter. This action will open a
console window within this specific directory. You can now use the makensis.exe to exectue your own NSIS scripts like that.
2: Inside the console type in "makensis.exe", leave a space and then "path/to/nsis/file.nsi" and run the command.
Keep in mind that the paths to your application are inside the NSIS script and absolute, so make sure everything is correct
before starting this process. The script will only give very little feedback into the console, this process may take some
time but it will finish eventually.
6. Hotfixes
v0.0.2 Hotfixes, December 2024
Bug 0001: Fixed Crash That Can Occur After Closing The Preview Mode
Bug 0002: Fixed Splash EXE Overwriting Debug Flags In App Link
Bug 0003: Fixed Asking 'Close Without Saving' After Project Delete
Bug 0004: Fixed Split View Breaking When Using Identical File Names
Bug 0005: Fixed Split View Breaking After Project Delete Or Reload
Feature 0001: Set Mouse Cursor To Default Style In Codemirror View
Feature 0002: Changed Splash EXE Name To Current Project Name